In Print: Dark Magic — The black arts of perfect pedaling performance
Originally posted on September 3, 2019 at 4:20 am by Eric McKeeganEditor’s Note: This feature first appeared in issue 205 of our print edition of Dirt Rag Magazine. Like what you see? Subscribe today so you don’t miss issue 213, the last issue of the year. Be sure to stop by your local bike shop to pick up a copy of issue 212, out now.
 by Eric McKeegan
Illustrations by John Ritter
In a perfect world, suspension would activate only when it was beneficial to the rider. When active, it would move only the amount needed to absorb the impact or provide traction, then return in a controlled manner to a static position. It is simple to describe, but impossible to achieve.
That hasn’t stopped a lot of very smart people from continuing to refine proven suspension systems or find a new iteration of pivot placements to solve the conundrum. Everyone claims amazing pedaling performance balanced with a bottomless feel to the travel, but most of the pitches are long on hyperbole and short on specifics.
Although marketing departments, PR firms and other dispensers of hype might lead you to think otherwise, everyone working today has to deal with the same set of parameters and compromises when it comes to building suspension bikes.
Rather than trying to tackle the entirety of suspension design, consider this a primer on how various systems handle the task of making a bike pedal without wallowing around like a washing-machine tub about to throw a bearing.
First, let’s look at what causes unwanted suspension movement.
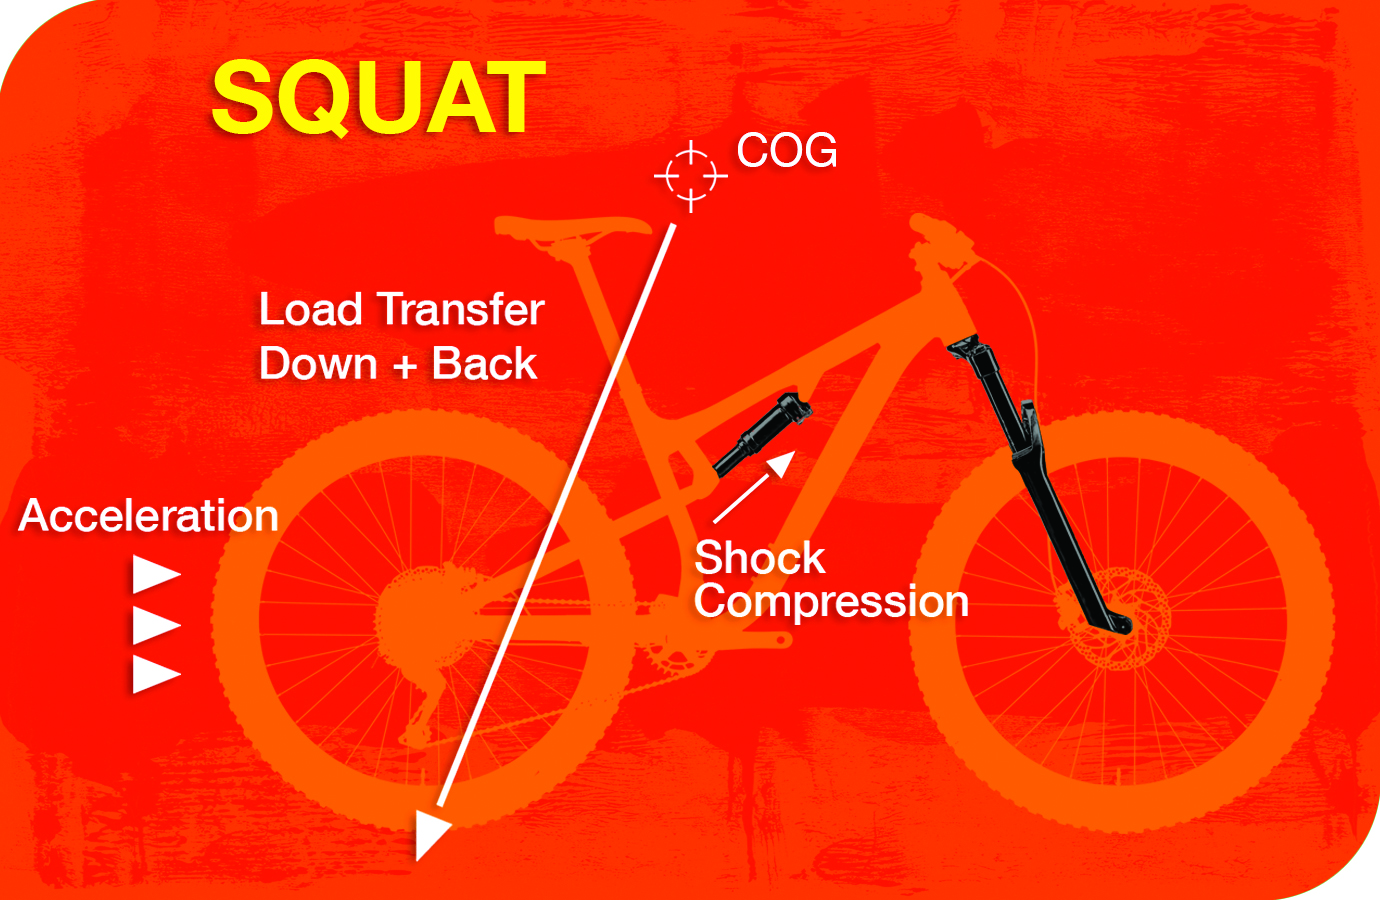
Squat
As we push down on the pedals to move forward on a bike, our mass wants to stay in place as the bike tries to move out from under us. This creates a load transfer back and down, which creates a force that wants to compress the suspension.
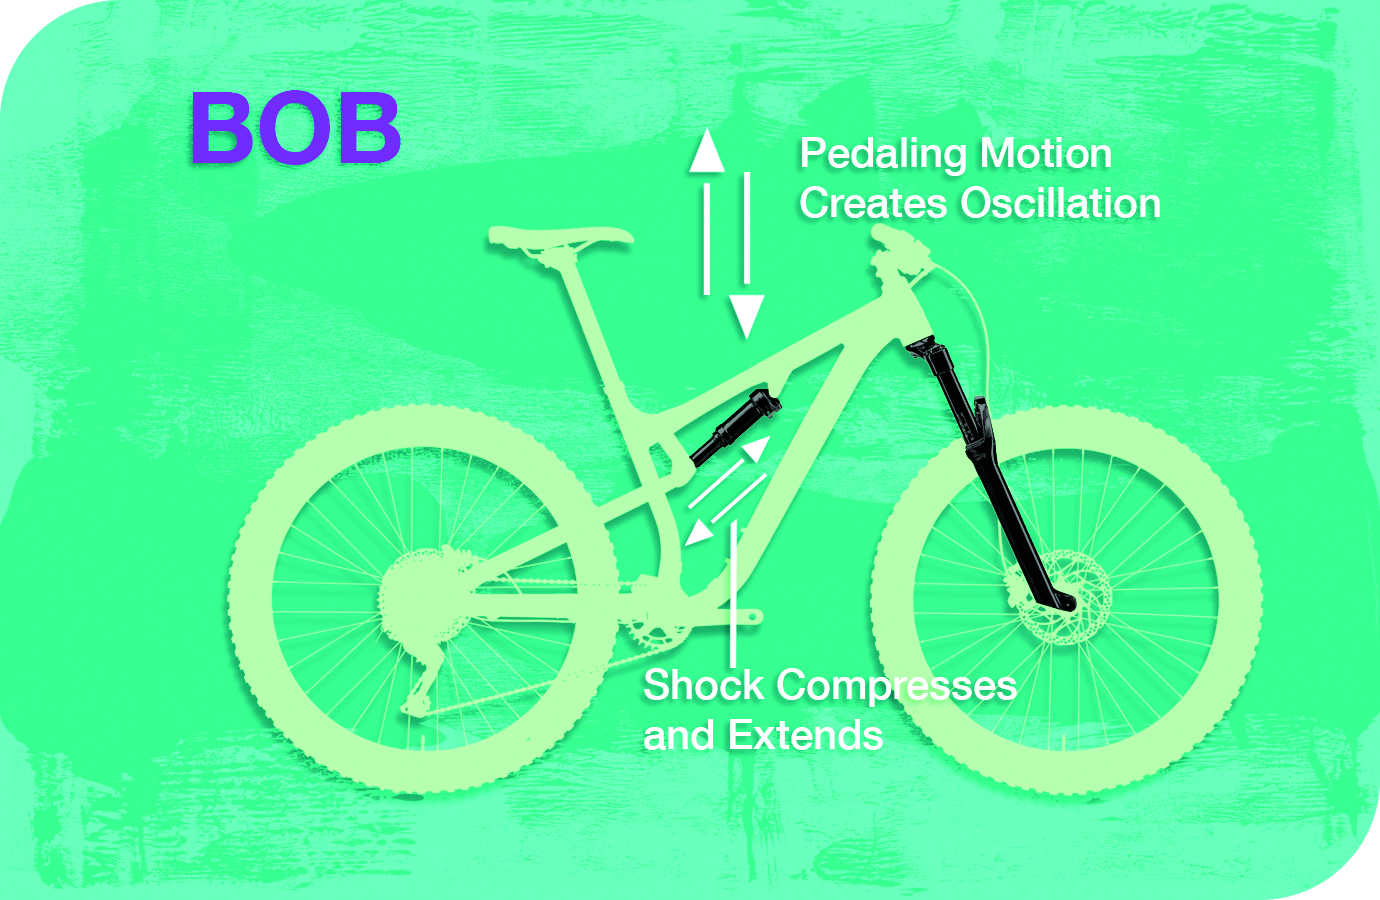
Bob
The oscillating force caused by the uneven way we power a bicycle with our legs.
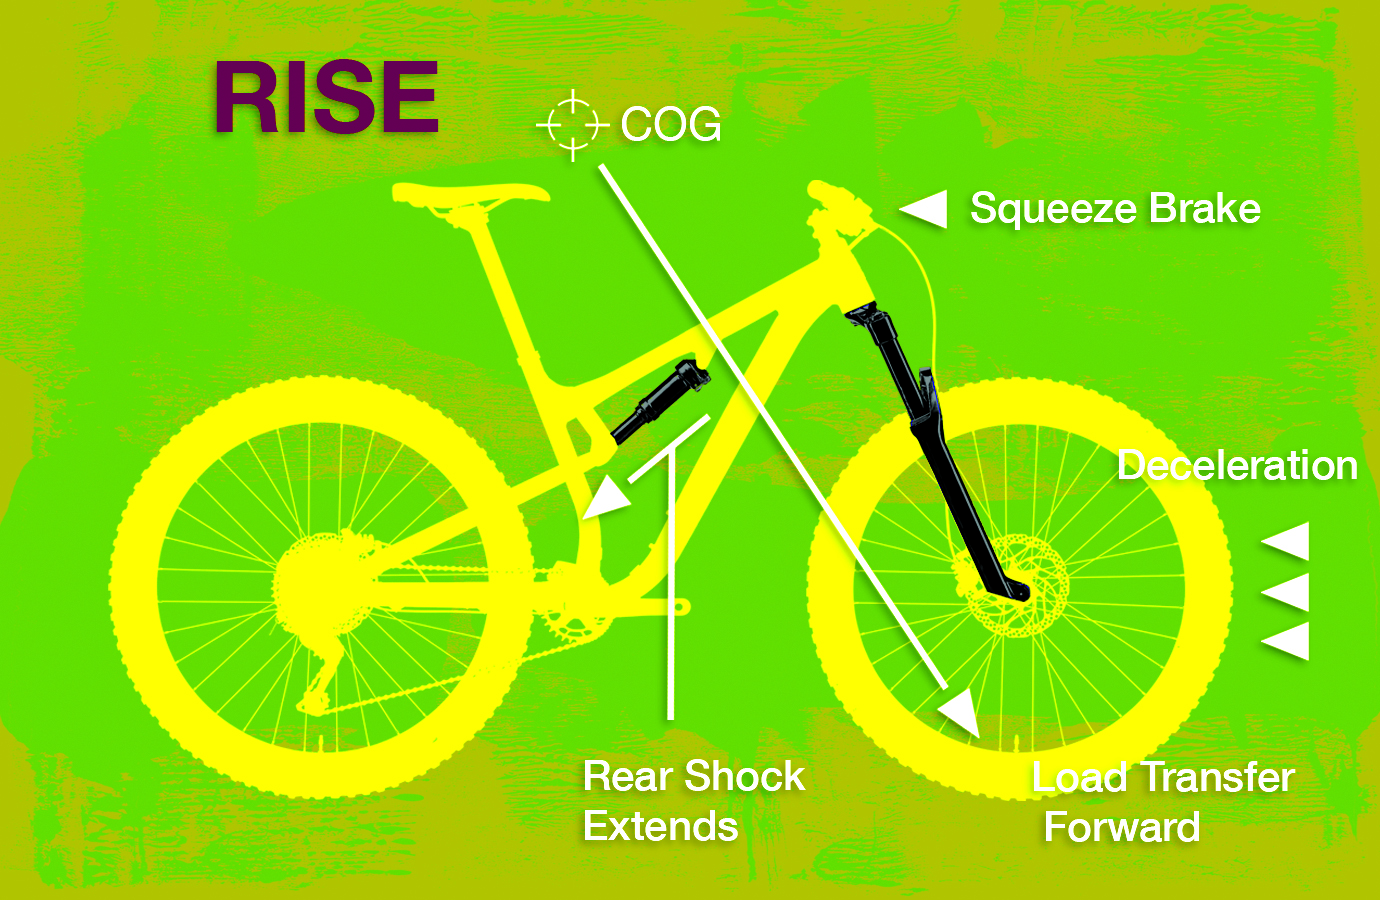
Rise
The tendency for braking forces to extend the rear suspension. This isn’t strictly involved with pedaling performance, but all of these things affect each other.
Fortunately, with good engineering, there are ways to deal with this unwanted movement.
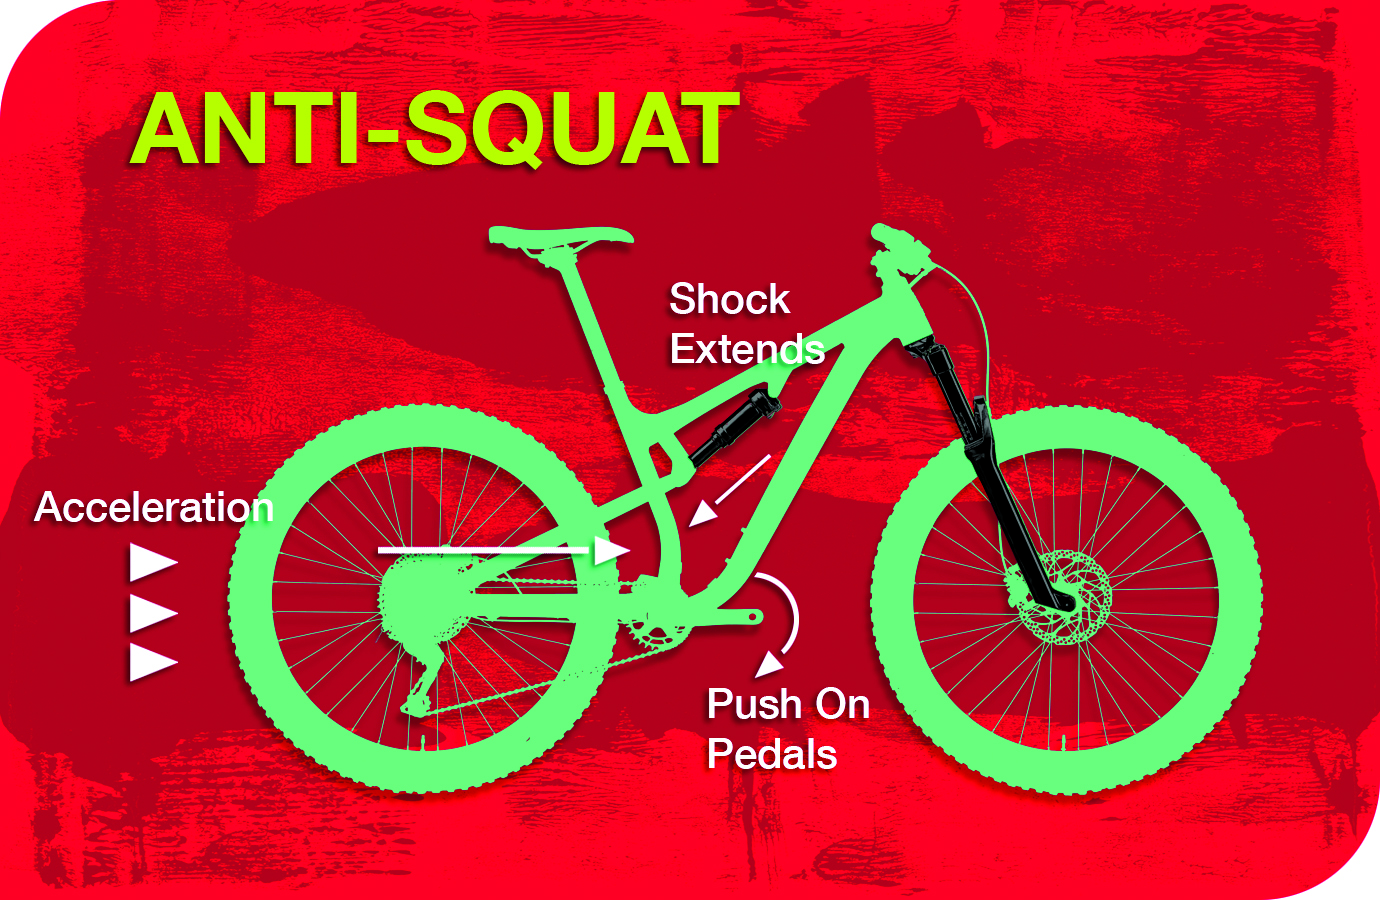
Anti-squat
Almost every modern full-suspension bike uses anti-squat to some extent — some much more than others. As we pedal a bike, anti-squat will use the force of the drivetrain to extend the suspension. In simple terms, as the rear wheel compresses, the rear axle moves away from the bottom bracket. Pedaling tries to pull it back. Anti-squat is most often expressed as a percentage, with higher numbers meaning higher levels of anti-squat. So 100 percent anti-squat, in theory, should perfectly cancel out the rider’s load transfer under acceleration, but still leave the suspension free to react to bumps.
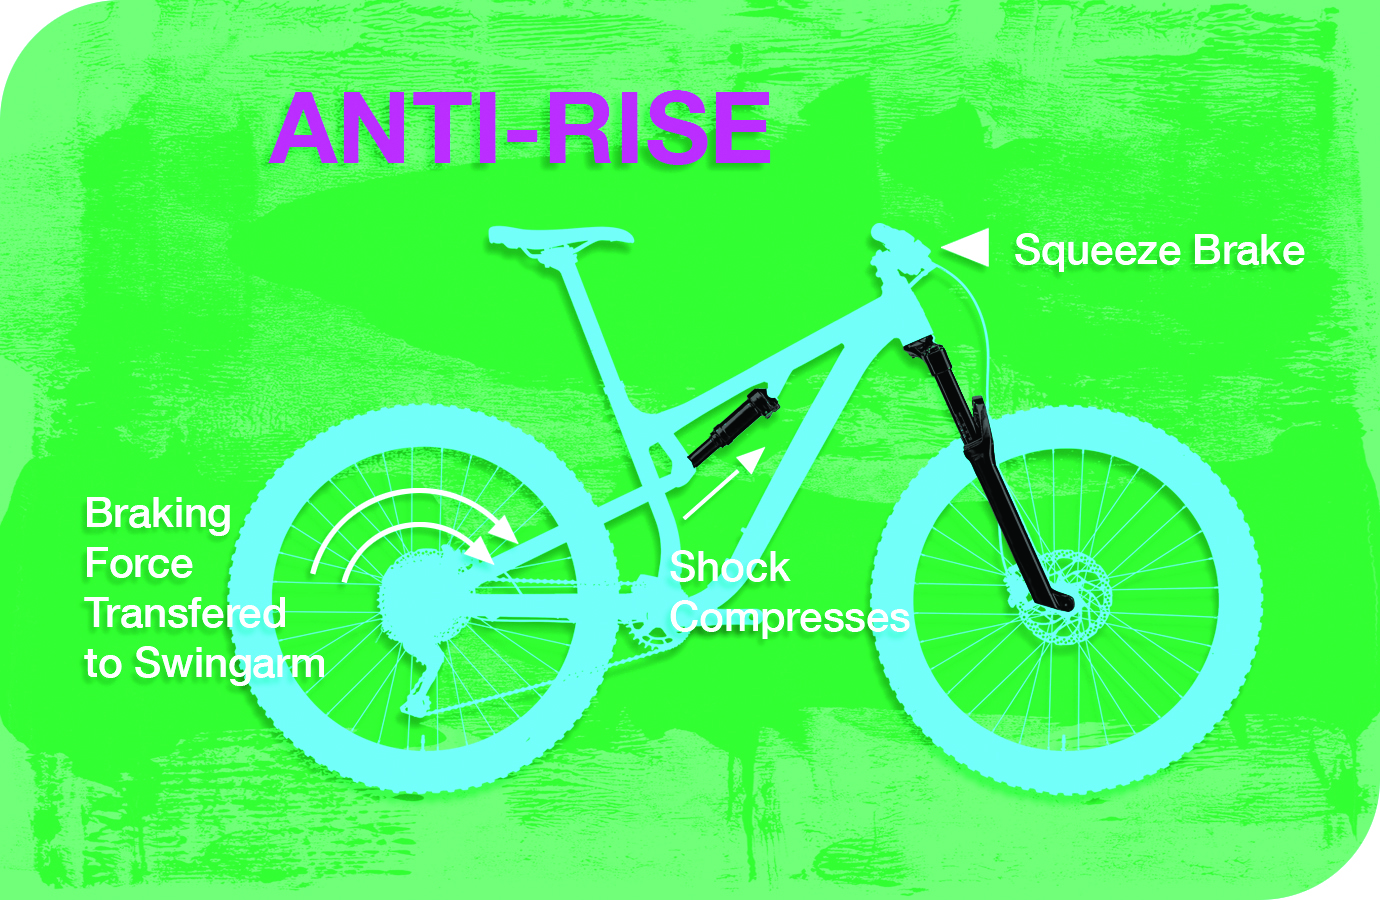
Anti-rise
Anti-rise is also expressed as a percentage. Applying the rear brake transfers the torque of the wheel into the frame. The position of the brake caliper can either work to extend or compress the suspension. Most designs have the goal of consistent suspension behavior with the brakes on or off, although some may be designed to induce some dive or rise.
Low-speed compression damping (aka pedal platform)
As the rear shock compresses, oil is forced through a series of small ports and shim stacks. This slows the shock movement, helping to control unwanted compression. Most modern bikes use a rear shock with a few different low-speed compression settings to tune the ride feel for rider preference and trail conditions.
There is a vast and confusing range of suspension designs on the market, but most can be separated easily into two basic designs. There are few other designs out there — Unified Rear Triangle, or URT; GT’s floating-bottom-bracket systems; Felt’s six-bar design — but they are becoming more and more rare on production bikes.
Single pivots
The arc of the rear axle is controlled by a single main pivot. The simplest of these have no shock linkage (Orange bikes; the discontinued Santa Cruz Heckler).
Most single pivots use a linkage to drive the shock and control braking forces. Good examples are Kona, Ventana and Cannondale.
Four-bar linkage
“Four bar” refers to the four suspension members that make up the suspension design. There is always a pivot between the rear axle and the bottom bracket on these bikes, and they mostly fall into two camps: Horst Link and mini-link.
The Horst Link has been around for decades, and with its patent now expired, it is becoming even more widespread. It’s most easily identified by a pivot in front of the rear axle. Examples are Specialized (the longtime patent holder), Transition and Rocky Mountain.
Mini-links use a pair of small linkages to attach a solid (un-pivoted) rear triangle to the main frame. Examples are Santa Cruz VPP bikes, Giant Maestro and dw-link bikes from Ibis, Turner and Pivot.
Even bikes like the Marin Wildcat and Yeti’s Switch Infinity are technically four-bar designs, with a sliding member taking the place of a link.
Some would make the argument that bikes with a pivot concentric with the rear axle are hybrids of these two systems (Trek ABP; Split Pivot bikes from Devinci and Salsa). If you like semantics, you can probably find someone with the opposite viewpoint on this topic and have a nice debate.
Some other terms you should know:
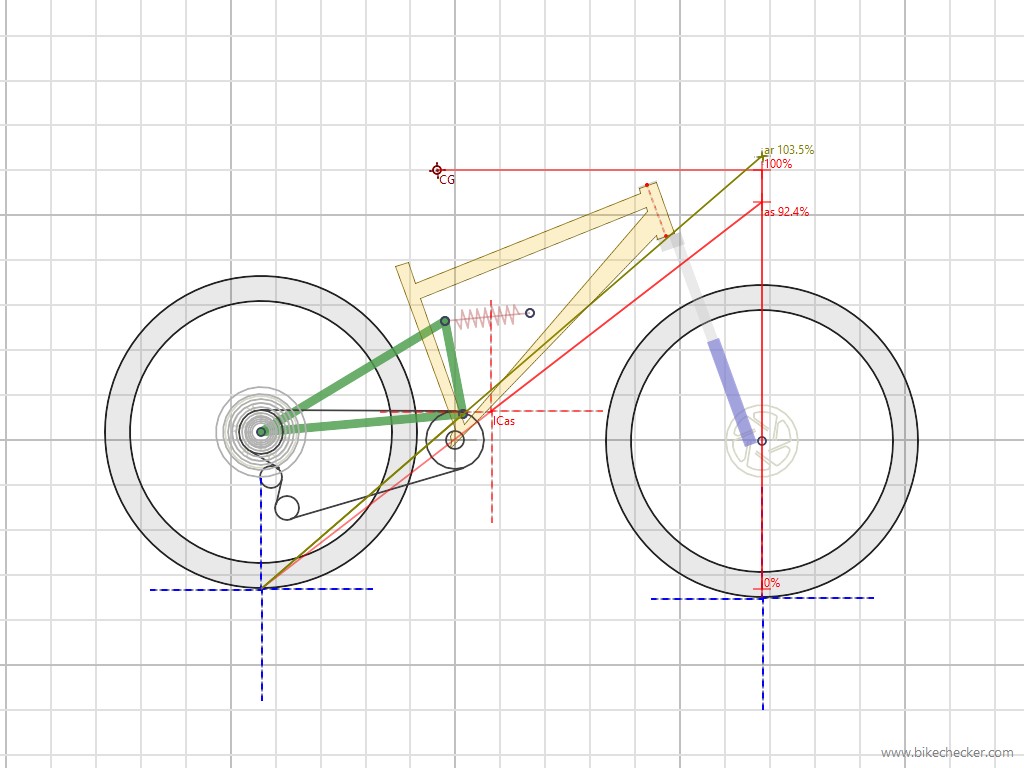
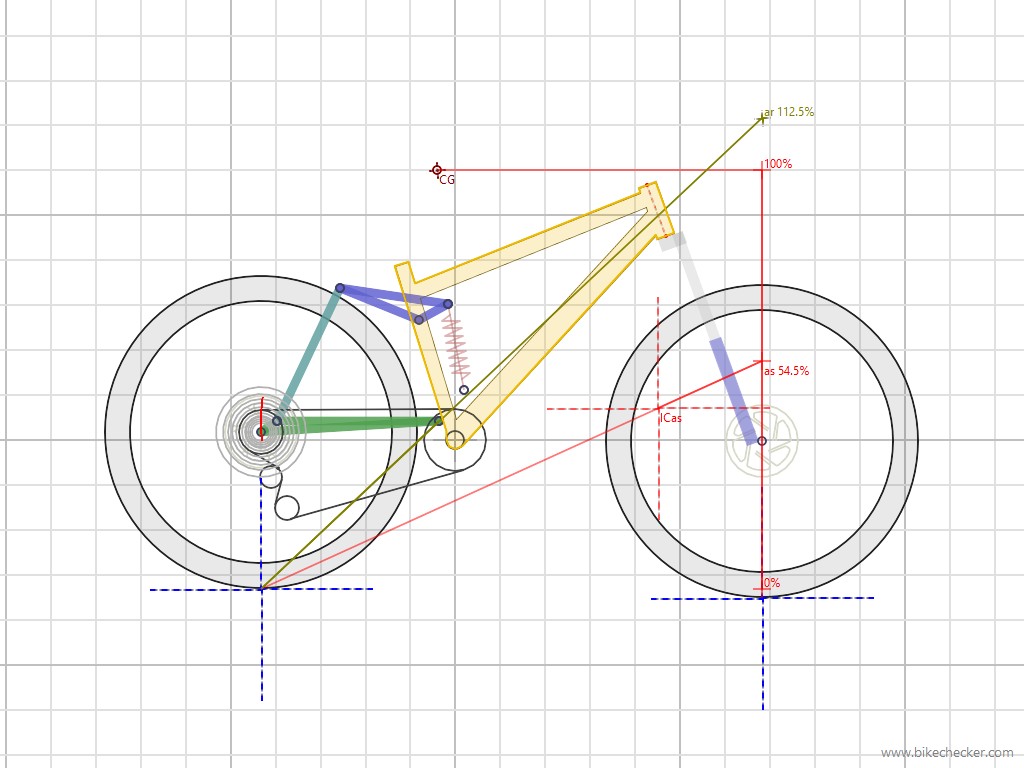
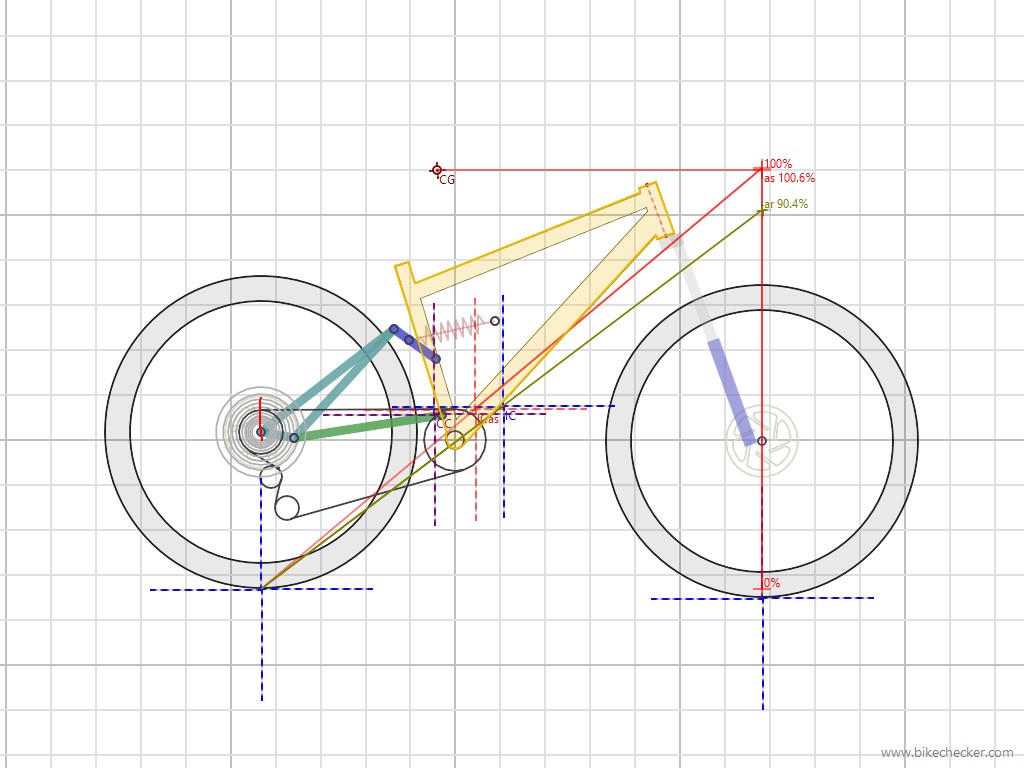
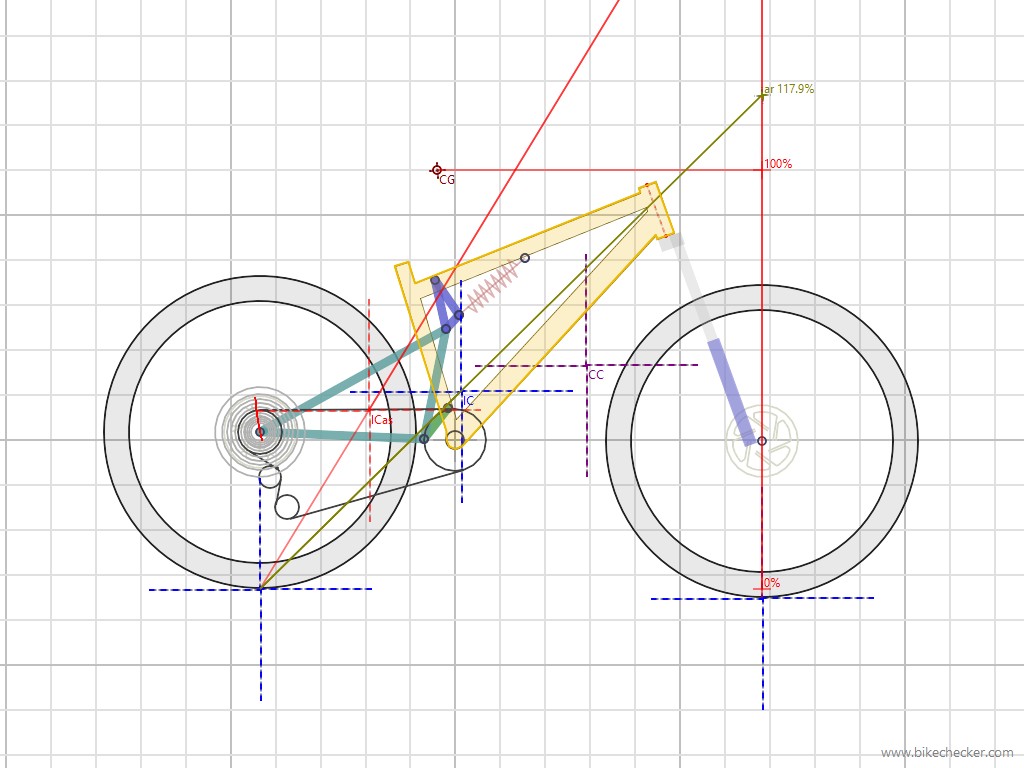
Instant center (IC): The point around which the rear axle pivots. It can be a single location or a moving “virtual” pivot location depending on the suspension design. Single-pivot bikes have a static IC; most linkage bikes have an IC that moves as the suspension cycles.
Chain growth: Related to anti-squat, chain growth is the result of the rear axle moving away from the bottom bracket. A suspension system that pivots around the bottom bracket would have zero chain growth, but also zero anti-squat.
Pedal kickback: Bikes with a lot of chain growth will attempt to pull the cranks backward under large compressions. Too much chain growth can make a bike harsh and unwilling to use all of its travel.
Chain line (aka drive line): The path of force in a chain. On bikes, this is the upper run of chain, and it changes angles as the chain moves up the cassette or switches between chainrings.
Center of gravity (COG): For a seated rider, the COG is estimated to be right in front of the button on your shorts.
The science and the art of pivot placement
The instant center is the key to a bike that pedals well. On single pivots, the IC is always the main pivot. The IC on a four-bar bike is located at the intersection of the two lines drawn between the linkages that control the axle path. The IC on a four-bar bike moves as the suspension compresses, which in turn creates changes in anti-squat percentages.
Figuring out those anti-squat numbers is based on where a series of related lines meet up, including some terms I am leaving out to prevent confusion. The diagrams below illustrate how this works, but the important thing is that a good designer can move the IC around to change the parameters of the suspension. There is no magic bullet for the perfect location.
Designers also have different ideas for just how a suspension bike should ride. This is a good thing, as it creates a range of bikes to suit many different riders, but it also makes for a very confusing marketplace. Most bike companies are reluctant to publish things like anti-squat and chain-growth numbers. I’d love to see the industry get together to find better ways to communicate this info to consumers, but it might be too complicated to distill into easy-to-understand data points.
Taking a look at the anti-squat graphs, you’ll notice that the same anti-squat percentages can be accomplished with an IC in several different locations. But all of those locations will also have an effect on many other factors that don’t involve pedaling, including anti-rise for braking. Also keep in mind that with the widespread adoption of single-ring drivetrains, pivot locations that were previously off-limits due to front derailleurs and multiple chainrings are now fair game, opening up new real estate to be explored for suspension design.
Also notice that these numbers are based on a fixed COG. No one rides mountain bikes sitting in the saddle all of the time, and with dropper posts almost ubiquitous on modern trail bikes, these measurements can change dramatically with shifts in rider position.
Designs often start with two-dimensional drawings and a series of charts and graphs, but a bike on a trail is a hugely dynamic machine. Forks compress and reduce wheelbase and head angle; riders stand up and raise COG; droppers drop and lower COG; trails go up and down and weight is shifted front and back.
Trying to account for all of those variables is impossible with current software, which is why suspension designs are tested through numerous rideable prototypes before final production. Even small tweaks to existing designs need ride time to insure that a small change to improve one part of the suspension performance doesn’t have too great of a negative effect on other parameters.
In other words, charts and graphs are great, but we don’t ride bikes in a computer simulation. The ultimate test is always whether a new design improves the ride experience on the trail.
Most suspension designs these days fall into one of two camps. Don’t judge a bike by its suspension design; very similar-looking linkages can have very different ride characteristics.
At one end, there are bikes with lower anti-squat numbers that rely on the suspension’s low-speed compression damping to pedal well. Some use off-the-shelf shocks, and some use damping features, like the Penske valve in Trek’s RE:aktiv valve shocks. Others use remotes to adjust the pedal platform or air spring volume, such as Cannondale’s Trigger and Jekyll.
With single-pivot bikes, it’s simple to determine anti-squat. A pivot above the chain line creates more anti-squat; position below the chain line will cause squat. Figuring out the IC location for four-bar bikes requires more than just a quick visual inspection. Even using a photo to create a linkage diagram can be problematic. Moving a pivot location a few millimeters can have a serious effect on suspension action.
Advantages of low-anti-squat systems:
- More ability to tune to rider preference, from ultimate plush to very firm
- Pedal platform can be turned off for rough terrain that doesn’t require pedaling
- Typically low pedal kickback and chain growth
Disadvantages:
- Varied terrain can require a lot of switch flipping to keep the bike in the zone of optimum performance
- Rear shocks with fancy valves get fancy price tags and may need more servicing
On the other end are bikes with high anti-squat. These bikes pedal well without needing much low-speed compression damping.
Advantages of high-anti-squat systems:
- Little to no need to flip switches — just get on and pedal
- Works well in rolling terrain
- Simplifies suspension setup
Disadvantages:
- Anti-squat can’t be tuned to rider preference
- High percentages of anti-squat can lead to high percentages of chain growth
Here are some things to keep in mind when you are looking for the next bike to add to your stable:
If your rides involve long climbs followed by long descents, a suspension system that relies on more low-speed damping to pedal well isn’t going to be much of an issue if the climb lever needs to be flipped only a few times a ride. But if you are on rolling terrain, a bike with higher anti-squat numbers is going to give you fewer things to manage while riding.
While most other aspects of suspension can be tuned to rider preference via things like damping adjustment, air pressure or volume spaces, anti-squat can’t be significantly changed. Changing chainring sizes can affect anti-squat, but usually only to a small degree. That makes it all the more imperative to take advantage of the millions of dollars of demo bikes that are traveling around the country at any given moment.
Get out on as many demo bikes and friends’ bikes and strangers’ bikes as you can. Experiment with all of the pedal-platform settings, and stand up and get sloppy while pedaling.
Finally, don’t neglect proper suspension setup. At the very least, get sag and rebound damping adjusted properly before any test ride. And don’t neglect to set up the fork as well. Even the most dialed-in and well-designed rear suspension is going to feel terrible climbing up a hill with a fork that is bobbing all over the place.