In print: Carbon Bike Repair
Originally posted on November 7, 2018 at 0:10 amEditor’s note: Dirt Rag #206 was our DIY issue, where we built a bamboo bike, a steel frame, and fixed a carbon bike. This is the carbon edition, written by Scott, our Operations Manager. Like what you see? Subscribe now to catch all of 2019 and follow along on all our hijinx. Dirt Rag #208 is on its way to the mailboxes of current subscribers, and will soon be available at your local bike shop and select bookstores (yes, those still exist).
There is no denying the fact that I am a fanboy of carbon-fiber bike frames. Perhaps it’s the inner XC weight-weenie convincing my brain into believing I prefer the ride quality over that of a metal frame or I simply have not fully developed into the Luddite ways yet.
Looking at the properties, an isotropic material such as metal has consistent strength characteristics from all directions. For example, when looking at a frame tube, the primary dimension from which the builder desires to build strength is front to back, but due to isotropy, the sides of the tube are also inherently durable, thus creating increased strength if you choose to enroll your bike in a game of bike-toss. When it comes to mass-produced bikes, this also means there is less freedom to tweak the ride characteristics in the tubing of the frame. A carbon-fiber frame, on the other hand, is a composite material consisting of carbon-fiber composite weave and epoxy. Its strength properties are not equal in all directions of the axis like its metal counterpart. The builder is able to create one axis to be extremely strong (stronger than that of metal) while the other direction remains weak and pliable. That’s where the layup process comes into play, as well as why carbon frames come with a hefty price tag. There is a lot of R&D for optimizing layup, as well as the type of carbon used in certain areas of the frame to provide strength and compliance where desired.

One thing carbon and metal frames do have in common, though, is that they both can fail. While you may think that your failed carbon frame is toast, that’s not necessarily the case. There are a handful of carbon-repair facilities with experts, or, if you’re willing to take a stab at your own repair job, there are also DIY kits available.
The kit
One of those DIY kits is from Predator Cycling. The company offers a carbon-repair kit for $99.95 that can be purchased through Amazon; however, you can save a few dollars going directly through the Predator Cycling website. The kit includes everything you will need to fix a small- to medium-sized crack. If you have a large crack or the frame is completely severed, it is advised to seek professional carbon-repair services.

The process
The 13-step instructional guide is fairly straightforward, but if you’re more a visual learner, Predator Cycling also created a three-part YouTube video series demonstrating how to tell if your frame is cracked and how to fix it using the company’s kit.
Once the frame is prepped (i.e., the crack is identified and the area masked off to contain the epoxy), you start by wet-sanding the area, removing the frame’s clear-coat, paint and the damaged composite material. After the sanded area is cleaned with the sterile pad, it’s time to cut and lay the carbon weave in a manner that matches the layup orientation of the frame. First, the epoxy and hardener are mixed and the repair area is given a thin coat of the mixture. Next, the carbon weave itself is brushed with the epoxy mixture, making sure to get a nice, even coating over the weave. Once the carbon weave is applied to the frame, you begin wrapping heat-compression tape around the repair area where you’ll use a heat gun to activate the shrink wrap. Once dry, 24 to 48 hours later, you use the wet sandpaper to smooth out the surface and blend with the non-repaired area. Spray some paint on the area to help protect the repair area from the sun and wet weather and, bam, repair complete.

The experience
Let me preface by fully admitting that I am not the crafty handyman type like my father. Give me a cordless drill and handsaw and I am certainly able to build an average Joe/Jane workbench. When it comes to adding a sliding drawer to that workbench, forget about it. When precision and mechanical know-how are required, that’s when I pick up a case of Coors Original and give my dad a friendly call. To be honest, I think that’s why I like building bikes; it provides a sense of craftsmanship even though I’m just procuring the pieces and assembling as directed. In a way, it’s sort of like a LEGO set, which I was quite fond of as a child. There is a full sense of freedom to create, but at the end of the day, the square pieces all fit together in the same manner.
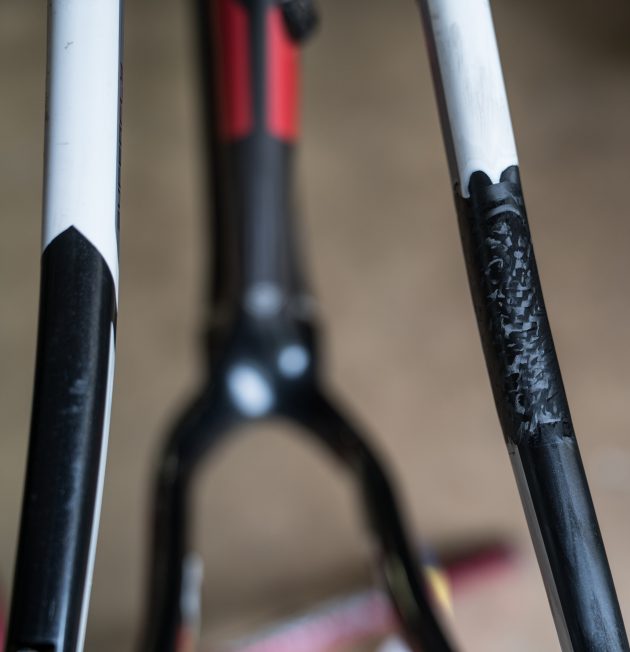
Having a cabinet full of spare MTB parts and wanting a commuter for the cheap, I posted a call-to-arms via my social-media network in search of an old MTB frame to resurrect. After only a few hours, I had a frame lined up from a local friend, and by the end of the following day, I added a 2010 Gary Fisher Superfly hardtail frame to my project list. This specific frame was damaged in a crash on the drive-side seatstay in two places. The cracks are roughly a finger width apart and no more than a fingernail in length, making the total repair area approximately 3 inches in length. Aside from the cracks being a clean break, the location also made this broken frame an ideal candidate for this novice to take a stab at a DIY repair.
From start to finish the repair took two days, and if it wasn’t for the 24-hour curing period it could have been knocked out in only a few hours. The entire process was simple, to the point that I started to second-guess myself. I must reiterate, this repair was straightforward for a few reasons. The damaged area was a small area, it was a clean crack with no indents, holes or large chunks of frayed fibers and it was on a straight tube. If this break was around the bottom bracket, head tube or a high-stress-point area, I can’t say how smooth the repair process would have gone.
Conclusion
Initially, my intent was to make this a backup bike that served only as a friendly commuter, but it quickly found itself on singletrack-specific rides more often than the road. Ride after ride I began to feel increasingly confident with my repair and started riding the bike in a more playful manner, as I would a normal MTB. To date, there have been no issues or signs of failure to come about. Being excited about how well this bike turned out, I ended up acquiring an additional frame to repair with more-modern geometry, boost spacing and, well, singlespeed capabilities.
Speaking of the second frame to repair, it was not until the search of a broken frame that I realized how many local friends have been hanging on to broken carbon frames from the last decade. I mean, this Fisher that I repaired is an 8-year-old bike; I was just getting into mountain biking at that time. These DIY carbon-repair kits offer an incredible opportunity to turn your old “junk” into a winter bike, a fun commuter or to build it up for a friend whom you are trying to get into mountain biking. Carbon is a durable material that doesn’t get enough credit. It is my hope that after reading about my experience that more people will take a stab at repairing their old frames; all it takes is a few hours of your time and $100 to get it up and rolling again.
