Yoga for Back Health
Originally posted on July 31, 2018 at 0:23 amIn 2011, I broke my tailbone on a bike ride. Combined with a youth of contact sports, contact-with-ground sports, and general punk rock idiocy, I have the same spine diagnosis as my 95-year-old grandmother. But like so many mountain bikers who have eaten their share of dirt, I don’t let a little pain keep me off the trails. In addition to heeding the advice I read in issue 142 of Dirt Rag back in 2009 (reposted yesterday), I have a daily yoga routine that keeps me limber in my lumbar.
When my back hurts, the last thing I want to do is make it worse by stretching wrong or agitating it, so the right yoga poses are crucial for making sure I do more good than harm. Even if you’re flexible, it’s important to be mindful of the injury you’re trying to prevent or heal, and not try to “win” at yoga. Here are some stretches I’ve found to help with my lower back problems, and I hope they help you as well. Keep in mind, I am not a doctor; I am not even a certified yoga instructor. But I’ve been practicing yoga at home and in studios for over 11 years, so I at least know what has and hasn’t worked for me. If you’ve never done a series of stretches before, it may be helpful to check out a beginner’s class at a local yoga studio, where the instructor can take time to make sure your alignment is correct.
1. Leg Up the Wall (or on a chair)
Start by lying on the floor with your butt close to a wall, with your legs going up the wall. This pose will do a few things: help relax your body as it is half savasana (corpse pose), take the pressure off your hips, and allow blood to flow out of your feet, which is both rejuvenating and relaxing. Stay here for 5-10 minutes, focusing on your body’s position on the floor and allowing each muscle to relax. Once we start paying attention to our bodies, we realize just how much stress we hold in our shoulders, back, hips, and elsewhere. Think about what might be causing the pain in your body, and focus your positive energy from this yoga practice into releasing that stress, whether it is an internal stress or an external stress.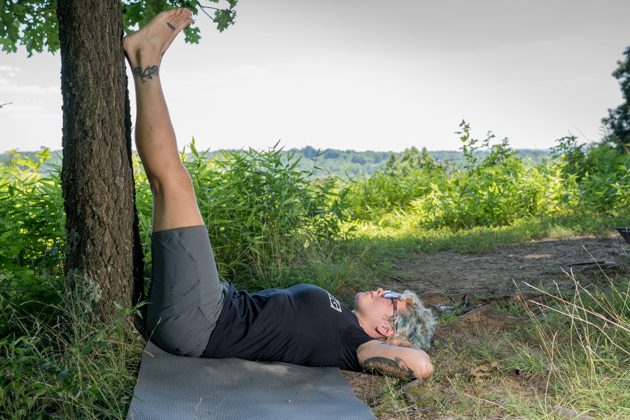
If your back is very sore and straightening your legs is already putting too much tension on your glutes or hamstrings, get away from the wall and find a chair. Lie back on the ground and place your calves on the seat of the chair. This will allow you to rest and take pressure off your hips without placing the weight of your legs on your tailbone or forcing you to straighten what isn’t yet warmed up.
2. Cat-Cow
Get on your hands and knees. Make sure your knees are hip-width apart and under your hips and that your hands are shoulder-width apart and under your shoulders. Take a long breath in, meanwhile arching your back and tilting your head back to open up your throat. Hold for a second, then breath out slowly, tucking your tailbone under and dropping your head, raising your back. Do this about twenty times, focusing on your breath, breathing in with your belly and lower ribs, and deflating yourself like a balloon with your core.

3. Child’s Pose/Supported Child’s Pose
From there, shift weight back, tuck your big toes together and open up your knees. Rest your butt on your feet and lean your torso between your knees. If this is painful, grab a large pillow to support your body weight. Place your arms in front of you, reaching forward with your arms to stretch out your sides while taking pressure off your spine. For some bonus points, as long as you have the mobility and are not experiencing pain, try keeping your hips square over your ankles and reach your hands first to the right, then to the left, to help stretch out your sides. Often times, pain in our back comes from tense muscles elsewhere in our body.

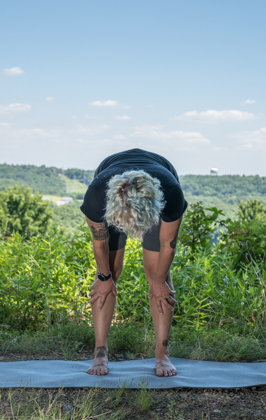
4. Forward Fold/Rag Doll/Half Fold
Come to a standing position with palms facing out (mountain pose), reach up, then fold forward from the hips, bending knees slightly as you go down. Reach your arms down, then come up halfway to realign your spine. Fold forward again and hold onto each elbow with the opposing hand, so your weight is hanging freely. Reach down again for the ground with your hands. If you can touch the floor, grab your big toes, but don’t force yourself past what your body is telling you.


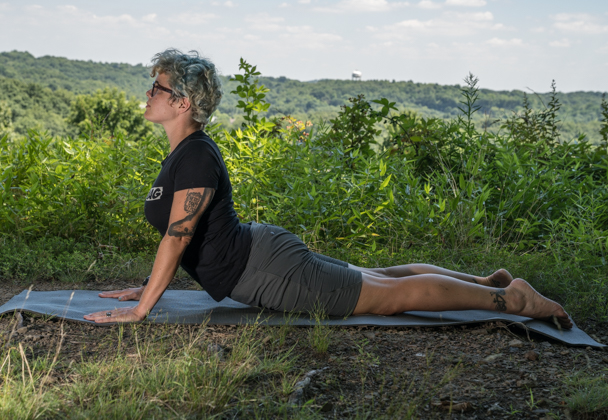
5. Baby Cobra/Cobra
After all that forward folding, it’s a good idea to open up. Lie on the ground with your stomach on your mat, head facing down. Place your hands by your ears and arch your back as much as is comfortable. Your forearms should be touching the ground, but only helping balance you, not supporting your weight. You should be able to pick your hands and arms off the floor without collapsing. If your back is starting to feel warmed up, push up with your hands into Full Cobra. Lower back to Baby Cobra and reward yourself with a snakey little wiggle, which will help realign your spine.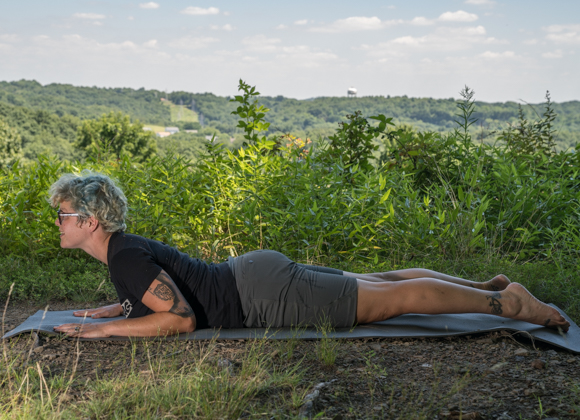
6. Upright Half Pigeon
There are a lot of ways to do this stretch, but I like this method if I’m feeling especially tight. I also call it Cradled Bread pose because I feel like I am holding baguet in my arms like a baby. Come to a seated position with a straight back and both legs straight in front of you. Bring your left knee to your chest with your arms, then open your hip so your knee rests in the crook of your left elbow, and your left foot is in the crook of your right elbow, with hands holding in the front of your leg. Try to align your hips by pulling your left hip forward and your right hip back, and keep your left shin parallel with the floor. Release your leg to the floor and repeat the stretch with your right leg.
Alternately, this can be done on your back. Lie on your back with knees bent. Cross your left ankle over your right thigh, then reach through your left leg and around your right leg to grab your right shin. Pull your right thigh towards you, careful to keep your hips square. The benefit of this version is that it takes the pressure off your tailbone if you have a lot of tenderness when sitting down. The negative is that it can put tension on your knee, and also can potentially allow you to stretch more deeply than is suitable for whatever muscles are tender. Remember, when trying to get into a state of regular comfort when you aren’t even thinking about your back pain, the trick is to do smaller stretches more often, rather than deep stretches off the bat.
7. Supported Bridge
Again, we open up the hips and chest after stretching out the glutes. Lie on your yoga mat on your back, and bend your knees so that your feet are near your butt and hips-width apart. Lift up your hips, creating an arch in your back. Pay attention to your body, and make sure your butt muscles are relaxed so your legs and core are doing the work. Wiggle your back and allow your shoulder blades to get close and your arms to tuck under your back. Bend your arms at the elbows, so your hands are under your butt, helping support your weight. Hold this pose for a few breaths, release back down to lie on your mat, and repeat.
8. Gentle Twist
Lie on your yoga mat. Bring both knees to your chest, then twist them so that they both lean to your left side. Open arms to both sides, and be aware of your body. If your right shoulder is lifting off the ground, bend that arm into an L shape to relieve the pressure from your spine. Breathe. Straighten legs and repeat on right side. If you feel up to it, you can place a hand over the top knee to help fortify the stretch, but be careful to just let the weight of your hand do the work and don’t try to force something that isn’t able to move on its own.

9. Corpse Pose
Lie down on your yoga mat with your legs straight and arms by your side, palms up. Allow your feet and thighs to roll away from each other. Close your eyes and do a final assessment of your body. Are you still in pain? Where? Are you still stressed? Acknowledge and honor that pain or stress, but don’t let it overtake you and stay manifested in your body. Let it roll out with your breaths, and bring your focus to your inhale and exhale. If pain or stress reenters your brain, again give it a moment but don’t dwell on it, and go back to your breathing. Allow this final moment to appreciate the time you spent for yourself, and acknowledge the importance of taking a few moments of “me time” no matter how busy you are. 