Trail Shooter Part 2: How to make better photographs
Originally posted on February 11, 2014 at 9:15 am
Recently we introduced you to the basics of how the basics of photography work. In the second half our our Trail Shooter guide to mountain bike photography, we look at the art beyond the skills.
So how do you go about creating more engaging photos? There are hundreds, possibly thousands, of different answers to that question. I’ll toss out a few that I think are important. This info is my synthesis of many thoughts and theories that have been passed down by generations of photographers.
Tell a Story
Great images go beyond the simple message of “Look at me, I was here.” Taking good mountain bike photos involves conveying a sense of place, so you’re first reaction is often to “take it all in.” Often times, these all-encompassing images don’t have a strong story, but are made up of many weak story lines, which are visually less interesting.
In order to tell the story, you have to define the subject. Ask yourself: “Is the subject the landscape, the bike or the rider?” Maybe it’s some interesting flora or fauna. Regardless, defining the subject will help you define your approach.

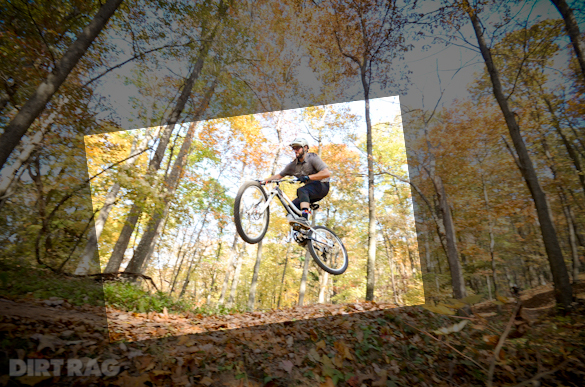
If you want to convey a sense of natural wonder, your photo may have a bike and rider as a secondary element. For example, in this photo the landscape is the subject, while the riders are supporting elements.
If you’re subject is a person, they should be the primary focus of the shot. It’s all about simplifying the image, stripping it down to the basics, so the photograph tells a strong story.
Show Depth
Maintaining a strong sense of depth is an important element of photography. Most images should have a foreground, middle ground, and background. Focusing on these three elements helps to place the viewer in the scene.
A few quick hints: When shooting a vista with a wide-angle lens, frame the shot with something in the foreground to give perspective and depth to the scene.

On the opposite end of the spectrum, use a longer focal length, 90mm+, to compress your foreground, middle ground, and background for an exaggerated feeling of depth.
Utilizing a larger aperture like f/1.4 or f/2 can add a very distinct sense of depth to an image by rendering just the subject sharply in focus, while the foreground and background are rendered out of focus.
If you’re shooting with a point-and-shoot, use the zoom function to shoot both on the wide and the long end of the spectrum. Many people shoot just at the wide end, rendering similar perspectives for all photographs. A variety of perspectives will tell a more interesting story.
Show Motion
Though this may seem difficult within the scope of a still image, motion blur, body language, and roost are all ways to convey a sense of motion to the viewer.

Show an Unusual Vantage Point
Shooting from a variety of vantage points can help to make your images more interesting. Sit or lie down on the ground, crawl up a tree—do whatever it takes to avoid shooting another eye-level photograph.
Show Detail
Your story will be strongest when you’re bringing the viewer along for the ride by showing some of the interesting details you experienced along the way. These detail shots help set the mood and tone of your story.

Exposure Compensation
Nearly all cameras offer a setting called exposure compensation. In the average mountain biking scene you’ll likely want to capture a range of exposures from -2 (darker) to 0 to +2 (brighter) stops. Your job as the photographer is to decide which exposure to select based on the subject.
A camera’s exposure meter does its best to average a scene to what is called middle grey (0) on the scale of exposing from pure black (-5) to pure white (+5). For instance, if you take a picture of something that’s purely white with zero exposure compensation, your camera will render that white object grey. Shoot something purely black, and your camera will again do its damnedest to render it grey. To avoid these pitfalls, you need to think like your camera and apply exposure compensation to render the subject like you see it. Few photos are purely black, or purely white, so the ratio of dark to white will dictate the amount of exposure compensation necessary.
Take snow for instance. We’ve all seen snow pictures that look dull and grey. That’s the camera trying to expose white to middle grey. Depending on the subject, apply +1 to +2 exposure compensation and your snow will suddenly look nice and white! On the contrary, if you’re trying to shoot a black silhouette in front of a sunset like the cover of our last issue (#160), you might dial in -1 to -2 (or more) exposure compensation.
Experiment with exposure compensation. Shoot the same scene in one-stop increments from -3 to +3 and you’ll quickly understand what I’m talking about.
Lighting
As mountain bikers, we’re often not able to select the day and time for ideal natural light—we’re out on a bike ride and simply have to deal with current lighting conditions.
Overcast skies are common were I live, but can often lead to some very nicely lit images. With cloud cover, your light source spans the entire sky, resulting in a soft, uniform, even light, which minimizes harsh shadows. This soft light can be very flattering for photographs of people, and can be OK for scenic shots, but the softness of the light can detract from the drama and texture of a sweeping vista. If the sky can be see in your shot, you may have to dial in some positive exposure compensation to maintain proper subject exposure.

When the sun is shining, good photographers often try to shoot early in the morning and late in the evening due to the beautiful warmth and drama of a low-hanging sun. Being in the right place at the right time is a very simple way to make better photos. Schedule rides early or late in the day to take advantage of this light.
For the most part, we’ve all been taught to shoot photos with our backs to the sun, which often makes for a well lit, but sometimes-flat photos. Shooting with the sun to your side will help bring a three dimensional feeling to your subject thanks to highlights and shadows. Combine a low, rising or setting sun and you’ve got a recipe for success.
Don’t be afraid to shoot in the direction of the sun, with your subject backlit. Backlit subjects often have a great three-dimensional feel thanks to the highlight separating them from the background. This backlit technique is particularly useful in mid-day sun, which can look very harsh and flat otherwise. By shooting into the sun you run the risk of a lower-contrast or flared image, but don’t fret. You can learn to use this low-contrast or flared feel to create a dreamy mood. Shooting into the sun often require application of +1 to +2 stops of exposure compensation to properly expose for your subject, which is in the shadows.
Rule of Thirds
Utilizing the rule of thirds is one of the simplest ways to improve your photography. Imagine two parallel and two vertical lines drawn equidistant from the edge of your image. Rule of thirds says your subject should fall loosely on one of these parallel lines. Same for horizon lines, which should fall on or near one of the parallels.
Utilizing the rule of thirds will add depth and a more dynamic feel to your images, rather than the stagnant feeling of having a subject smack in the middle of your frame. Generally, you’ll want your subject facing into the open portion of the frame, giving the sense the rider is moving into the image rather than out.
Cropping
Cropping can be a very important tool Cropping to is useful to fine-tune an image, or when shooting with a specific aspect ratio in mind.
Shoot, Shoot, Shoot
The success rate for even the best photographers rarely tops ten percent, meaning they’ll likely shoot at least 10 photos to get one keeper. For most aspiring photographers, that means shooting hundreds of images to yield just a few worthy photos. Fortunately, digital storage is cheap these days. Experiment with composition, exposure compensation, shutter speed, and aperture settings so you have a variety of images to choose from when editing. Don’t be afraid to ask your subjects to ride a section of trail multiple times to capture the best image you can.
Edit Ruthlessly
Shooting tons of pictures means you will have many images to wade through to find the best. I like to take one pass through my photos and delete all of the obviously crappy ones (bad exposure, out of focus, bad composition, missed timing, etc.). From there, I select only the best photos, use the minimum number of photos to tell your story. A few strong images tell a better story than many weaker ones.
Conclusion
Like mountain biking, honing your photographic skills is a life-long endeavor. There’s a wealth of free information on the Web and countless photography books on the market. Immerse yourself in the study of photography and you’ll find the results are well worth the effort. Have a photo you’d like to share with us and fellow readers? Send it to [email protected]. We look forward to seeing your fine images in the pages of Dirt Rag!